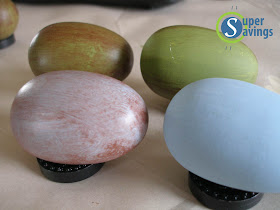
But then I came across these great Springy Eggs from Andrea at BubbleWrappd and we loved the natural colors and thought they'd work perfectly in our home. It seemed like a fairly inexpensive decoration to make, and since the hubzy liked it too it was a go.
(reg. $4.99 each, on sale for 50% off)
(I used "Baby Blue" and "Basil")
(wouldn't have been my first choice {in price or color}, but I also didn't want to drive to the craft store again, so we gave it a shot......I do think you could try using a much cheaper brown paint to get a similar effect)
We decided to paint 5 blue, 5 green, and leave 6 white before the brown coat. We gave the blue and green ones 1 coat.
When I started using the stain, I thought I'd just squirt a little on the egg and wipe it off......here's what happened.
Yeah, not good. It was a mess......although right now it's looking a lot like melted chocolate......mmm. Almost time for supper....I'll try to focus!
After applying (much) less with a cloth to the other eggs, I wiped it off and set it down to dry. It was a little difficult to get it even and then set it down to dry without messing it up (I eventually set each egg on checkers to help them stay a little more stable and have less contact as they dried). The first coat of stain ended up re-wetting the paint and taking some off.
I wasn't quite what we were imagining, so we decided to put a second coat of paint on and try again.
I had to wait a while for the second coats to dry, so I played with the paint a little and painted a picture. ;) I came across a blogger that created a beautiful piece of art based on a World Market picture like this, but I can't find where I bookmarked it! If you know what I'm talking about (or you are that crafty blogger!) let me know!
EDIT: Lesly, my new hero left me the link to the tutorial I was talking about! So, if you want to see an actual good remake, check it out. Thank you Lesly!! =)
Once the eggs were dried, I then applied the stain again and wiped off, as evenly as I could. Here are the eggs, with and without stain.
Here are the finished eggs.....
We decided to put them in a big hurricane type vase (it probably came from Goodwill), that was housing corks from wine bottles beautifully above our kitchen cabinets. I had some shredded brown paperish stuff I had on hand (originally from Dollar Tree) and put that in the bottom of the "vase" and it was alright, but I definitely preferred the color and natural look of the moss in the inspiration post.
So, back to Hob Lob to grab some Spanish Moss and Jute/Twine (each reg. $2.49, purchased with a 50% off coupon) = $2.49 total
I reassembled the eggs on top of the moss and wrapped the twine around the glass. The ends of the twine were laying kind of wonky, so we tried incorporating some ribbon from the Menu Board project to help it sit right.
(Sorry I had a heckuva time photographing the glass while trying to avoid window reflections.......yeah, didn't work out so well). I'm really liking it, and am now all decorated for Easter.....oh ok, the kids might want to decorate some eggs of their own. ;)
So all in all, we ended up spending just over $15 - not as inexpensive as I thought it would be, but we now have oodles of stain, twine, paint and stuff leftover - and eggs all ready for next year too! =)
What do you think? Do you prefer it with the ribbon or without? How do you decorate for Easter?
Edit (3/28/13):
This year I decided to change it up a bit and put the eggs in a little "nest" instead of the vase. I picked one of my favorite bowls, lined it with the moss and laid the eggs inside. I like it!
(*you might notice the paint is showing a few scratches after a couple Easters....I think it looks fine with the rustic/earthy style, but you might want to give them a spray of clear gloss to protect them.)
Linking up to these fabulous linky parties......


.JPG)
http://twogirlsbeingcrafty.blogspot.com/2011/02/painted-wall-art-for-non-artists.html
ReplyDeletethere is the world market art tutorial. I made one myself several months ago and LOVED the original, just like you!!
lesly
Oh my-LAN-ta!! That's exactly the tutorial I was looking for!! I thought it was a crazy long shot to mention it and hope that someone might know what I was talking about. Thanks a million Lesly!! =)
ReplyDeleteYou did an awesome job! I think they turned out great!
ReplyDeleteThanks for linking back to me!
(Also! I'm your newest follower! :) )