Mine certainly didn't turn out as picture perfect as Bakerella's, but they were not difficult and they were yummy!! I shouldn't have waited so long! I used her directions to make Red Velvet cake balls and read some of the comments there for some tips.
I gathered my supplies......
- 1 Red Velvet cake mix
- 1 tub cream cheese frosting
- chocolate almond bark
I started by making the cake mix according to the directions.
Then we cut off the edges to make sure there would be no hard bits mixed in. I think next time I might use our stoneware 9x13 because the edges don't seem to get "crusty" like in a glass pan. Emma could hardly resist eating up the "scraps"!
I used the KitchenAid to make it easy to crumble up the cake....it was weird to make a cake with the intention to break it up, but I knew it would be worth it.
Then we mixed in the tub of frosting and started rolling out the cake balls. Some people suggested only using about 2/3 of the tub, but I used the whole thing and it worked fine. Maybe try it and see what consistency you like.
Here's my great helper.....she did a much better job than I thought she would since I was worried about myself getting them all rolled nicely, lol. It didn't take as long as I thought either.
After we got them all rolled out, we popped the tray in the freezer to help the cake balls firm up and make sure they didn't crumble when we dipped them in chocolate.
After about an hour of chilling in the freezer, I dipped them in melted chocolate almond bark and let them dry on wax paper (next time I might try a cooling rack). Then I melted some white chocolate and drizzled that on top and sprinkled some red sugar while it was still wet.
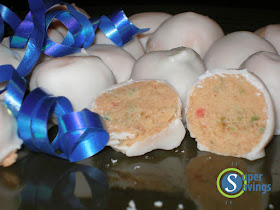
We were in a hurry to pack up and drive to see family for Christmas, so I didn't get the chocolate dipping process or the "sliced open" shot so you could see how pretty the red inside the chocolate was. But they were prettier than the picture looks, lol, and really yummy....they were gobbled up fast!
~*~*~*~*~*~*~*~*~*~*~*~*~*~*~*~
The Red Velvet ones were actually my second batch, the first ones were ones that my daughter Gracie requested for her birthday. She chose a funfetti cake mix with an orange frosting (vanilla flavor - Halloween clearance) and white almond bark. The combination possibilities are endless!
I baked the cake and once cooled, broke it up into a bag and added the frosting.
Then we mushed and mushed and mushed.......
......until it all was completely mixed together. It was simple to do, but took some time.....I think I'll use the mixer again next time...unless I have some frustration to work out. ;)
..
Then we rolled the mix into balls and put them in the freezer.....for a while. Since it was my first attempt and I was nervous about coating with the chocolate, I left them in there for a long time.....like weeks.....maybe even months, lol. They were still good though! Which made me think this could be a great treat to have on hand in the freezer.....just waiting for company to impress!
Delicious and not scary to make. ;) I was happy with how easy they are to whip up. They do take some time, but it's easy time......(like baking the cake and freezing to get firm)....
They're not difficult to make, and they are yummy and impressive. I love that both the adults and kids like them too. The only downside is that they're maybe a little too easy to eat though! ;)


Thank you for Taging me in your post:)! I invented a cake ball roller too if you start making them all the time;)http://heavenlycakepops.com/?page_id=386
ReplyDeleteYou're welcome Jennifer! I think I saw your cake ball roller on Bakerella's website once....what a super idea! =)
ReplyDeleteThanks for stopping by!
~ Mara