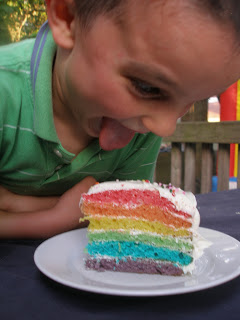
I was a little nervous at first to try this cake -- it looks so impressive that I thought it might be tough, or I'd mess it up. If you're worried about that too - don't be! It could hardly have been easier! There are a couple more steps than a "normal" cake, but it's so simple!
I started with a white cake mix (Duncan Hines maybe? You could use any white cake mix - boxed or from scratch) and mixed it up according to the directions on the box. Then I separated the batter into 6 cups.
{don't let the picture confuse you, he was just repositioning the pencil}
We placed the wax paper in the bottom of the pan, sprayed it with Pam and poured one color in. It was pretty thick so we had to spread it out a bit. Then we baked it for 15 minutes at the temperature on the box -- 350 I believe.
When the first two came out, it wasn't pretty, lol! I don't know if my batter was extra thick or what, but it didn't spread on it's own like I'm used to cake batter doing. I spread it a little better in the next pans.

The next day when I was ready to assemble them, I got out Cool Whip for between the layers and Whipped Cream Cheese frosting for the outside. I considered making my own frosting and filling, but had no time for those kinds of shenanigans with all we had going on...maybe next time.
To start, I layered 3 pieces of wax paper on the cake plate to keep it clean. Then I put a dollop/smear/smidge of frosting on the center of the cake plate the keep it from slipping around. I started with the purple layer on the bottom and spread Cool Whip on it. Then I turned the blue upside down onto the purple layer and peeled the wax paper off, and spread Cool Whip on that layer......and so on in rainbow-tastic order.
{at this point I was thinking it was looking a little cattywampus, but I shouldn't have worried...}
{thanks to my awesome sister for being the impromptu photographer}
{that's my beautiful mama helping me}
When they were all stacked and Cool Whipped, I spread a thin layer ("crumb coat") of the frosting over the whole thing and put it in the fridge for about 30 minutes.
Then I spread the rest of the frosting over the cake, pulled the wax paper out and viola!
I liked it simple on the outside because of how fantastic of a surprise it would be when you cut into it, but it looked a little plain. And I like there to be a hint of what's inside too, so I decided to put some sprinkles on top.
Then when we cut into it.............
Beautiful! I was really happy with how it turned out and everyone loved it!
Because I used Cool Whip, the layers did tend to slip off each other a little bit once it was cut into slices, but everyone gobbled it up so quick I don't know that it mattered much. I do think it kept the layers nice and moist though -- next time I might use frosting in between - or frosting for some, Cool Whip for some.
I would make some tweaks to improve it (like maybe use 2 cake mixes and 2 -3 cans of frosting - or make my own), but for the first try I'm very happy with it overall. =) I'm thinking about maybe doing a Pink Lemonade party, like this one, for my Emma's 4th birthday next month (I'm in denial.....but still planning a party), and maybe alternating pink and yellow layers!
What do you think? Have you seen these around blog-ville? Maybe too much? ;) If you try it, let me know how yours turns out - I'd love to see it, and share your picture too!
Linking up to.....


6 comments:
What a great idea and love the tutorial! Thanks for popping by, I am now following you via google, fb and pinterest. Karima x
www.karimascrafts.com
Hi
I made this cake for my daughters birthday last weekend. It was also a big success!!
Christeen
Thank you Karima, I'm following you back. Love the bunk beds on your Pinterest boards! =) Glad you came by!
Christeen, I'll bet your daughter loved it! It's such an impressive cake. =) Thanks for commenting!
This is awesome! Love the tutorial and how EASY you made it look! Great job.. Thanks so much for sharing with the Pink Hippo party.. can't wait to see what you share next week.. and I am your newest follower!
Thanks Amie - it really was easy! I'm following you too! Thank you for hosting the Pink Hippo Party - and thanks for the feature! =)
~ Mara
Following you on pinterest! Love this idea!
www.busymomonthego.com
Post a Comment