Showing posts with label decorating. Show all posts

Monday, November 23, 2015

Thankful Leaves Craft - fun display of gratefulness


Christmas has always been my favorite holiday, but the more time goes on the more I just *love* Thanksgiving!  I love the chance to get together with friends and family of course...but also the low-key gift-free low-expectations time, amazing food, and more than anything - the focus on gratitude.

Over the past few years I've been learning, reading, and growing in the understanding the importance and power of gratitude.  It's incredible how simply turning your attention to your blessings instead of your problems can change your entire outlook on life!!


Our best friends had us over for Thanksgiving last year and she had this cute (and simple!) craft project set up. Blank paper leaf shapes were spread out on the table with pens ready for us to write down what we were thankful for. The kids went for it right away, and I loved seeing the things they were grateful for!


This concept isn't new of course, jotting down what we're thankful for at Thanksgiving...but I really liked how Amy had it set up, and how it added such great color and was part of the decor!  She had strings hanging from the curtain rod, so once we wrote out our little leaves, we grabbed a clothespin and hung it up in front of the window...it was a beautiful display to see so many of the blessings in our life.
I love the idea of doing this throughout the year, not only at Thanksgiving! 


When you do this, you could either cut your leaves out of construction paper, or buy ready made die-cut leaves. And you could display them in many ways of course...
  • hang them vertically like my friend did
  • hang them like a banner
  • scatter them on the table or buffet
  • make them into a "tree" on the wall
  • gather some branches and make them into a "thankful tree"


Happy Thanksgiving, friends!!

Wednesday, December 17, 2014

FREE ebooks: Christmas Gifts in Jars, Angel Crafts, Daily Devotional for January 2015, Homemade Mixes, Goal Setting


Amazon is currently offering these e-books for Kindle for FREE! 

  • If you don’t have a Kindle, you can just download a free reading app from Amazon which will allow you to read this on your PC, iPad, iPhone, blackberry, android, Mac and more!
  • Prices change often.....if it's still FREE the price will be listed as $0.00
~~~~~~~~~~~~~~~~~~~~~~~~~~~~~~~~~~~~~~~~~~~~~~~~

Get your copy of "Christmas Gifts In Jars: Create Beautifully Simple Holiday Gifts In Jars That Friends And Family Will Love" for FREE (5 star ratings and print version is $8.87!)

http://www.amazon.com/gp/product/B00QXFMY1O/ref=as_li_tl?ie=UTF8&camp=1789&creative=390957&creativeASIN=B00QXFMY1O&linkCode=as2&tag=super0bb-20&linkId=ATGCIKBPZ7GDU4ND


Get your copy of "
16 Angel Crafts to Make: Homemade Christmas Ornaments & Decorations" for FREE

http://www.amazon.com/gp/product/B00NO1A4T4/ref=as_li_tl?ie=UTF8&camp=1789&creative=390957&creativeASIN=B00NO1A4T4&linkCode=as2&tag=super0bb-20&linkId=U4QDOJV6VFGX237Q


Get your copy of "
Daily Wisdom for Women 2015 Devotional Collection" for FREE

http://www.amazon.com/gp/product/B00Q7RIEKI/ref=as_li_tl?ie=UTF8&camp=1789&creative=390957&creativeASIN=B00Q7RIEKI&linkCode=as2&tag=super0bb-20&linkId=UFT3VS7DVRNTI2UD


Get your copy of "Homemade Mixes: Make It Yourself and Save" for FREE

http://www.amazon.com/gp/product/B00JIVJH6U/ref=as_li_tl?ie=UTF8&camp=1789&creative=390957&creativeASIN=B00JIVJH6U&linkCode=as2&tag=super0bb-20&linkId=H2BKHHN6VFVCZAMC


Get your copy of "Love Language: Of Goal Setting How To Have A Happy Marriage And Loving Relationships" for FREE

http://www.amazon.com/gp/product/B00F743E7K/ref=as_li_tl?ie=UTF8&camp=1789&creative=390957&creativeASIN=B00F743E7K&linkCode=as2&tag=super0bb-20&linkId=F32MCFF4CQNZJFHG


Get your copy of "In the Dailies: Finding God in the Midst of the (Seemingly) Mundane" for FREE (through Saturday)

http://www.amazon.com/gp/product/B00PJ95V4C/ref=as_li_tl?ie=UTF8&camp=1789&creative=390957&creativeASIN=B00PJ95V4C&linkCode=as2&tag=super0bb-20&linkId=P27IDZBPEFWSIVJH

Monday, April 7, 2014

Wall Decals at Dollar Tree and Amazon - easy and cheap way to decorate!

When we were renting I tried to make our home more comfortable and look like "us", but had some trouble since we were not allowed to paint and that was my go-to to quickly and easily change a room.  One of my favorite discoveries were wall decals -- super easy, non-permanent, and no damage so the walls were still in perfect shape.

Even though we own our house now and have more freedom in decorating, I still love them!  They're a really fun way to add personality to a space without a lot of hard work or commitment.  They're very easy to apply, and easy to remove - and there are so many options to choose from...classy, whimsical, funny, inspiring.  Some of them even look like they're hand painted on the wall.

I have butterflies in the girls' room, a beautiful quote on our living room wall that my mom gave us, and yesterday I found a great monkey/vine decal that will be perfect above Lucas's bed.
(When I brought the monkey decal home, Lucas spotted it in the DT bag and before I said a word, he grabbed it and with a beaming face he asked, "Is this for me???"  Then he proceeded to hug it and show it to his siblings, lol!  So, it was a big hit.)

I found the butterflies and monkey at the Dollar Tree - seriously, they were a dollar!!  The butterflies have held up well and added so much to our girly girls room.  And if they get tired of them...they can peel right off - no repainting necessary!

If you don't have a Dollar Tree nearby, or just aren't crazy about their selection, I've found some very inexpensive wall decals on Amazon too.  Here are a few examples....

Purple Flower Butterfly Decal - $3.60 shipped


Lotus flower decal - $5 shipped


Joshua 24:15 - $4.40 shipped


Have you used wall decals before?  What's your favorite easy way to personalize your home?

Saturday, February 15, 2014

Amazon: Owl and Butterfly Wall Decal only $3.69 Shipped!


I recently shared a really cute (and cheap!) DIY customizable wall decal idea on the Super Savings Facebook page, but I've found this deal on Amazon for an adorable decal really cheap with free shipping!

This Owl and Butterfly decal is only $3.69 + FREE shipping!  It would be perfect for a little girls room, a play room, or a baby nursery - even as a baby shower gift!


Wednesday, November 13, 2013

FREE eBook on Amazon.com: "Homemade Christmas"


Amazon is offering the "Homemade Christmas" e-book for Kindle for FREE!  This book looks like it's chockful of ideas for a great stress-less Christmas!


  • If you don’t have a Kindle, you can just download a free reading app from Amazon which will allow you to read this on your PC, iPad, iPhone, blackberry, android, Mac and more!
  • Prices change often.....if it's still FREE the price will be listed as $0.00

~~~~~~~~~~~~~~~~~~~~~~~~

"Have fun during the holidays without spending a lot of money!

Do you get stressed out around Christmas time because everything seems so disorganized and you feel the pressure to spend way more than you feel you can actually afford? It IS possible to enjoy the holidays without having to pay for it for the next 5 years!

In the Homemade Christmas e-book, you'll find lots of helpful tips including:
- 90 Homemade Gifts and Gag Gifts from Easy Bake Oven Mix to Sugar Scrub to Homemade Christmas Coal
- A Holiday "To Do" List
- How to Have More with Less at Christmas
- How Can I Spend Less on Presents Without Looking Cheap?
- How To Make A Candy Christmas Wreath
- Christmas On A Budget!
- Homemade Gift Basket Ideas
- Gift Wrapping Ideas
- Gift Wrapping Money
- Save Money With Unusual After Christmas Buys
- Our Favorite Christmas Recipes
- ...and much more.

Get the Homemade Christmas e-book today and enjoy a happier and more stress free holiday season!
"

(thank you Stacy Makes Cents!)


Monday, February 25, 2013

Target: FREE Picture Frame!


Grab this printable coupon and get a free picture frame at Target!

     {{Deal Scenario ~ Target}}
RE Picture Frame - $2
- $2/1 printable Target coupon
= FREE!


(thanks Money Saving Mom!)

Friday, September 7, 2012

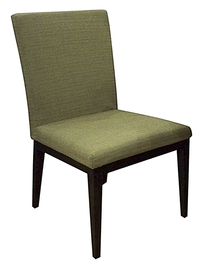
Lowe's: Clearance Indoor/Outdoor Parsons Chairs less than $25 each!

{the stock photo shows it looking a little green, but they're actually tan like you can see in my photos below}

I just happened to see one of my favorite bloggers, Abbie over at Five Days, Five Ways, post about this awesome deal she got at Lowe's Home Improvement yesterday on Facebook!  2 Parson's chairs for $49.50 (reg. $198)!!  I love this style and we need new dining room chairs in a bad way!
Also, the reviews on the Lowe's website are great!

They're indoor/outdoor chairs and sold as a patio chair, but quite a few people use them as dining/kitchen chairs.  They're mold/mildew resistant and all that and I think they'll be perfect, non-staining, wipe-able chairs for our family of little ones!  They even have "easy-to-clean removable covers".....music to my "mama" ears!

{Lucas "helping" me assemble}

I ran to my store this morning to see if they had any, and lucky me, they had some!  Even though they're weather-proof (Sunbrella fabric), they're not "plastic-y"....they're more soft and comfortable than I thought they might be.

I bought 3 sets and am excited to surprise my husband when he gets home in a few days with a new look for our dining room!  (It took less than 4 minutes for me to assemble my first chair!  You only have to attach the seat to the frame - and all the stuff's included.)


Set of 2 allen + roth Dellinger Cast Aluminum Patio Dining Chair:
  • Durable, hand-brushed, wood-looking finish
  • Rust-free aluminum frame
  • Easy to assemble with the tools provided
  • Indoor/outdoor use
  • Fully-upholstered, quick-dry chair
  • Easy-to-clean removable covers

Lowe's has a lot of their patio furniture clearanced 10-50% off, time to take a look for some great end of the season deals!

(thanks Abbie!)

Wednesday, December 14, 2011

Christmas Party -- Fun Easy Ideas for Food and Decorations!

I just love Christmas time.  I love the music, the smells, the foods, the lights of candles and Christmas trees, and the "excuse" to have a great time with friends and family.  Hubzy and I hosted a Christmas party this past weekend, and it was a really nice time!

We had a White Elephant gift exchange which was hilarious! I found a zippered coconut at a yard sale a few years ago and thought it was a perfect White Elephant gift!  I held onto it just waiting for the occasion.......but since we didn't have a White Elephant party to go to, we planned our own.  ;)

First, we cleaned and decorated the house.....we reworked the dining room centerpiece and made it all "Christmas-y".  We tried lots of different combinations of candles, glass pieces and ornaments, and the hubzy finally came up with this......I love it!


We reused some of the blue glass that was in the original rustic fall-ish table centerpiece, in our nativity set arrangement.  My sister gave me this Willow Tree nativity set as a gift a few years ago and I love it!! It's one of my very favorite things to put up when we're getting the Christmas decorations out.


I also gave our sad, sad front door wreath a makeover.  Years ago I had wrapped some wired burgundy ribbon around it that was leftover from our wedding......and it stayed that way for 12 years!  I wish I had taken a picture to show you how sad it was, but it was embarrassing.  I thought I'd try to put some new life into it. 

I wrapped some new gold ribbon (from clearance after Christmas a few years ago) around it, tucked some ornaments in it (tying them on with some skinny black ribbon so it wouldn't be seen), then tied up a bow to finish it off.  I'm certainly no wreath or bow expert, but in about 30 minutes it looked soo much better!
(now that I'm looking at the picture though, I'm going to have to rotate some of the ornaments to better balance the colors....I did this just a couple hours before the party)


We tweaked the living room a little......normally there are "squooshed" marbles around the votive holders in these candle holders, but we added some green by replacing them with split peas (like I saw here). 


We also have a cool old wooden box sitting on a credenza that we decided to fill with ornaments.....like a box of Christmas treasure.  ;)


In our living room hangs a great picture of palm trees that we found clearanced at Bed Bath and Beyond a few years ago, but it just seems weird to us to have palm trees on the wall, in the Winter.....in Michigan.....but the wall looks naked without a picture, so we wrapped it in wrapping paper and ribbon, and I made another bow.  It adds some fun color to the lonely side of the room that's opposite the tree.
(sorry it was hard to get a good picture...but you get the idea)


There were going to be kids and adults at the party, so our menu was kid-friendly.  Friends brought snacks to share, like cheese and crackers, and those yummy pretzel/hershey kiss/M&M treats. 

Of course I used Pinterest as a resource to find some yummy treats.....and like usual, it did not disappoint.  ;)
We had these tortilla roll-ups, that I attempted to stack into a Christmas tree, but they didn't quite turn out like this picture. 


My sister assembled a "mini-sausage wreath" (little smokies wrapped in strips of crescent roll dough, baked into a ring like a wreath), and I was going to make these pretty winter cupcakes, but ran out of time.  I also thought about making a red and green layered Christmas cake (like the easy Rainbow layered cake I made this Summer), but changed my mind so that we could stick with finger foods.

I did however make these Reindeer Cupcakes that were a big hit. I had a great little team of helpers that helped attach the eyes, noses, antlers, etc.  I think they turned out so cute and they were yummy too!


I don't really have a tutorial for the cupcakes since they were so easy, but here's what I did:
  • make a boxed cake mix according to package directions
  • spread chocolate frosting on top of cuppycakes (I used a tub from Aldi's)
  • place a Nilla wafer for the nose/mouth area
  • add tiny twist pretzels for the antlers
  • use coconut M&M's as eyes ("gluing" them on with a dab of frosting)
  • "glue" an M&M nose on
  • add a dot of frosting on the eyes (using a frosting bag with a writing tip would've been neater, but I was in a hurry since guests were already arriving -- an edible food marker would work great too!)


As everyone arrived, we talked and gathered around the food, then we had the kids do their White Elephant exchange.  There were 14 of them, ages 4-11....and it was pretty funny to see their reactions as they tried to figure out this weird way to give gifts, lol. 

When they were done, the adults did our gift exchange.....good times!  It's always fun to see what everyone brings to a White Elephant party.  We also played CatchPhrase which is one of my favorite games....it's just one of those games that's perfect for adults or kids, whether you have a few minutes or a long time to play!

We had lots of laughs and fun with friends, but didn't have to spend a lot.  It was a pretty cheap party!  I hope that maybe I've given you some frugal ideas for recipes or decorating for your holiday soiree!  =)


Do have a Christmas party planned, that you're either hosting or attending?  What kind of yummy treats will you make?  Are you a fan of White Elephant gift exchanges?


Linking up:



Saturday, October 15, 2011

DIY Table Centerpiece - Easy, Beautiful and FREE!

I recently made a centerpiece that we use on the dining room table and the buffet, and I'm so happy with it!  I love how the twine and burlap gives it a natural, rustic feeling, but the glass and mirror gives it a polished look....it gives off the most beautiful glow.....


I was inspired by Thrifty Decor Chick's beautiful centerpiece, and thought that something like that would be perfect for our dining room.  I didn't want to spend anything on it though, so I used what I had on hand and it turned out to be a great free project!

I started telling the hubzy about it, and said I wished that I had a "back of the door" mirror like she used......he suggested just using one of our rectangular wooden framed mirrors that we have arranged on top of our china cabinet (you can see them in the pictures where I showed you our Easter egg craft)......he's so smart!  ;)

I had no time to spare since it was the busy week before our housewarming party, but I was so excited that I just went for it - and it came together so quickly! 

I grabbed any clear or blue jars and vases we had around the house......some were recent thrift store finds I showed you on the Facebook page....(just the blue ones below, the clear one holds Q-tips in our bathroom, and though it's pretty I didn't think it would be stable enough for candles)


Next I got out some white votive candles and arranged (and re-arranged) all the jars, vases, and candles on the mirror until I was happy with the layout.  I put a candle inside any container that was big enough to hold one.

I liked it like that, but thought it needed a little something more, so I got out my twine and burlap (2 of my favorite things!) to soften it up.

I wrapped a couple of the votive holders with twine, and added strips of burlap and twine to some of the bigger containers.....no rhyme or reason, just whatever I thought looked good.


I like how the burlap and twine feels "Fall-ish".....I'm thinking about finding some little bits of orange -- ooh, maybe some of those tiny pumpkins! I'll probably change it up for the seasons too.....around Christmas time, adding ornaments, changing out the blue containers for reds or greens, and ribbons instead of twine....adding some color with dried beans, lentils, or coffee beans around the "inside" votives.....maybe adding shells or starfish in the Summer.....


What do you think??  I'm so happy with it!

If you try this and use a frame/mirror like I did, and it has a "teeth-y" hanger thing on the back, you may want to tape over it or remove it so it doesn't scrape anything you set it on.......like when your daughter tries to move it off the table and leaves a big old scrape across it.....just sayin'.  =/  (that's ok though....the next week she had a sleepover birthday party and nail polish remover got spilled and took the finish off one of the legs.....ahh, that poor table -- it's so overdue for a makeover)

**I made sure to position the twine and burlap away from where the candles will be burning.  We often light it after the kids are in bed, but I usually keep it out of the reach of kids anyway so that they don't play with it and leave the twine or burlap over the flames.


Linking up......


I {Heart} Naptime!

"Look What I Made" party at Creations by Kara


Thrifty and Fabulous


HookingupwithHoH


Photobucket